
$11 3.1 Unpacking and store of instrument
$1· Unpacking of the instrument
Place the case lightly with the cover upward, and unlock the case, take out the instrument.
$1· Storage of instrument
Cover the telescope cap, place the instrument into the case with the vertical clamp screw and circular vial upwards (Objective lens towards tribrach), and slightly tighten the vertical clamp screw and lock the case.
$11 3.2 Setting up the instrument
Mount the battery in the instrument before performing this operation because the instrument will tilt slightly if the battery is mounted after leveling.
I. Set up the tripod first: extend the extension legs to suitable lengths and tighten the screws on the midsections. Make sure the legs are spaced at equal intervals and the head is approximately level. Set the tripod so that the head is positioned over the surveying point. Make sure the tripod shoes are firmly fixed in the ground.
II. Step on the tripod to make sure if it is well stationed on the ground.
II. Mount the instrument on the tripod head. Supporting it with one hand, tighten the centering screw on the bottom of the unit to make sure it is secured to the tripod.
$11 3.3 Centering position and leveling up
1. Position tripod legs so that the plummet is aimed to the ground mark point. Turn on the laser plummet.
2. Turn three foot screws of the tribrach till the center of reticule exactly coincides with the surveying point at any position.
3. Move the tripod legs to centre the circular level. The instrument is now roughly leveled-up.
4. Center the bubble in the circular level.
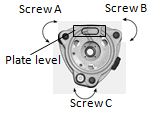 |
Loosen the horizontal motion clamp, and turn the instrument till the plate level is perpendicular to line shaped with screws A and B. Adjust the screws A and B to make the bubble in the center of the level. |
 |
Turn the instrument approximately 90°. Adjust screw C, till the bubble will be in the center of the level. |
|
Repeat above steps until the bubble remains in the center of the plate level while the instrument is rotated to any position. |
|
5. Center the surveying point again.
Loosen the centering screw slightly. Looking the laser plummet point on the floor, slide the instrument over the tripod head until the surveying point is exactly centered in the reticule. Re-tighten the centering screw securely.
6. Check again to make sure the bubble in the plate level is centered.
If it is not, repeat procedure 4.
$11 3.4 Setting of tilt correction on vertical angle
When activating the tilt sensor, it will show the correction value of vertical angles because the instrument is not perfectly leveled. To ensure the measurement accuracy, the tilt sensor should be activated, which will facilitate you to level the instrument better. When “Tilt Over” shows, it needs to be leveled manually.
Single axis compensation: Correct the index error of vertical angle. When it exceeds the correction limit of vertical angle, the system will show notice.
Disable tilt sensor: Close the tilt compensator.
If the instrument operates under an unstable status or windy days, the vertical angle displays unstably. In such circumstances, the tilt sensor should be disabled, so that it will avoid the instrument from displaying error messages as well as abortion of measurement caused by the tilt sensor exceeding the correction limit.
E.g.: Setting Tilt Correction
|
Operation Steps |
Key |
Display |
||||||||||||||||||||||||||||
|
1) Enter to Star key Mode. |
[★] |
|
||||||||||||||||||||||||||||
|
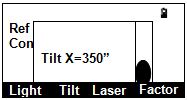
2) Press [F2] to enter to tilt correction settings. |
[F2] |
|
||||||||||||||||||||||||||||
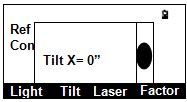
Follow the steps described above to center the black dot as shown on the right |
|
|||||||||||||||||||||||||||||
|
4) Press ESC to return to Star key mode |
ESC |
|||||||||||||||||||||||||||||
|
If the tilt sensor is disabled, press [F2] (TILT) to activate the correction function. |
||||||||||||||||||||||||||||||
$11 3.5 Reflecting prism
When measuring distance, a reflector prism needs to be placed at the target place. Reflector systems come with single prism and triple prisms, which can be mounted with tribrach onto a tripod or mounted onto a prism pole. Reflector systems can be self‐configured by users according to job.