
2.1 Power On/Off
|
Vz: |
90°10’20” |
||
|
HR: |
122°09’30” |
||
|
Save |
Set0 |
SetA |
P1/2 |
Confirm the instrument is leveling, press the red key [POWER], release [POWER], the instrument will turn on and it will display the angle measurement mode screen.
|
Vz: |
ENT à Power off |
|||||
|
HR |
ESC à Quit |
|||||
|
3 seconds auto quit |
||||||
|
Save |
Set0 |
SetA |
P1/2 |
|||
Press the key [POWER], the instrument will pop up “power off” dialog box, [ENT] key will shut down.
$11 2.2 About Battery
2.2.1 Battery Power Symbol
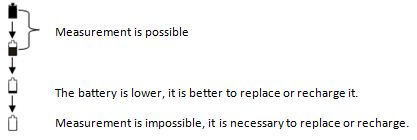
NOTE:
$1· The working time of battery will be effected by many factors, such as ambienttemperature, recharging time, recharging and discharging times. On the data safe side, we suggest the users recharge the battery full or prepare several full batteries before operation.
$1· The battery symbol only indicates power capability for current measurement mode. The power consumption in distance measurement mode is more than in angle mode, if the instrument enters into distance measurement mode from angle mode, the power maybe auto-off because of lower battery.
$1· The symbol only indicates the supply power but not the instantaneous power change. And if the measurement mode changes, the symbol will not show the power’s decrease or increase immediately.
$1· It is suggested to check every battery power before field work.
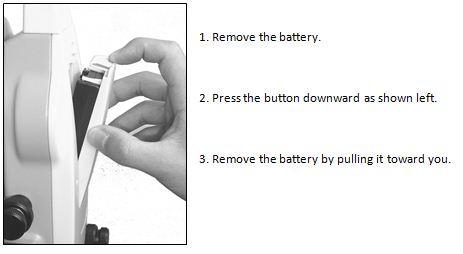
Cautions for Removing the Battery:
When removing the battery, please switch off the instrument in case the instrument may be damaged.
Charging the Battery
· Charge the battery with the appropriative charger (NC‐20A).
· Before charging, link the charger with the electrical outlet first. Unload the battery from the instrument and connect the charger plug with the charging outlet of the battery. When the indicator light of the charger is orange, it means the battery is being charged. When the light is green, it means the batteries is charged and full; please pull out the plug.
Cautions for Charging
· The charger has built‐in circuitry for protection from overcharging. However, do not leave the charger plugged into the power outlet after recharging is completed.
· Be sure to recharge the battery at a temperature of 0° ~ ±45°C, recharging may be abnormal beyond the specified temperature range.
· When the indicator lamp does not light after connecting the battery and charger, either the battery or the charger may be damaged. Please connect professionals for repairing.
Cautions for Storage:
· Rechargeable battery can be repeatedly recharged 300 to 500 times. Complete discharge of the battery may shorten its service life.
$1· In order to get the maximum battery life, be sure to recharge it at least once a month.
2.2.2 Replace the Battery
2.2.3 Recharge the battery
Mount the battery
Insert the battery to the instrument
Press the top of the battery until you hear a click.
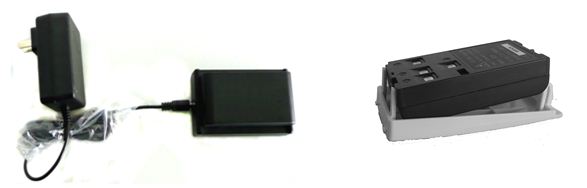
As above figures show, connect the charger and the battery, then plug the charger into theoutlet of 110V-220V AC power supply, recharging will begin.
NOTE:
$1· The indicator light on the charger will illuminate three separate colors for varies mode conditions:
Solid Red Light—indicates that the charger is working;
Solid Green Light— indicates that the charge has finished;
Flashing Red Light—indicates no battery on charging, poor connection or some problems exist.
$1· It is recommended to continue charging for 1 or 2 hours after the light turn green.
$1· Once the red light flashes constantly after the charger is plugged into the outlet of 110V-220V AC power supply please remove the battery and reconnected it after 3 or 5 min.
$11 2.3 How to input Number and Alphabet
All Number and alphabet inputting must be carried out in a dialog box. For example, input point name PR001 and STN -123.456 in “Setup station” dialog box.
1. Press [F3], the soft key prompt will switch “Alph.”.
2. Press [6], ’P’ will present in input box and the caret shift to next position.
3. Pause about 0.4second,because the next alphabet ‘R’ is relational with [6].click [6], ’PP’ will present in input box, click [6] again ‘PR’ will present in input box.
4. Press [F3], switch into Number input mode.
5. Press [0], ’PR0’ will present in input box.
6. Press [0] again, ’PR00’ will present in input box.
7. Press [1], ’PR001’ will present in input box.
8. Press [ENT], end dialog.